
Ever wondered if you could build a functional web application from scratch in a single sitting? With Django, it's entirely possible! In this tutorial, we'll guide you through creating a basic yet comprehensive Django web application. By the end, you'll have a solid foundation to explore more complex projects.
We'll assume a basic understanding of Python and web development concepts. Let's dive in and discover how easy it is to bring your ideas to life using Django's powerful framework.
You can find the complete code on this repository.
Streamlined Project Setup for Your Django App
Let's get started by setting up your development environment for this Django project. We'll use a virtual environment to isolate project dependencies and avoid conflicts with other Python installations.
Create a Project Directory and Virtual Environment:
Open your terminal and navigate to your desired development folder.
Create a new directory for your project, for example, feed:
$ mkdir feed
$ cd feed
Initialize a virtual environment within the project directory using python3 -m venv:
$ python3 -m venv .venv
Activate the virtual environment (commands differ based on your operating system):
Linux/MacOS:
$ source ./venv/bin/activate
Windows:
.\venv\Scripts\activate
The terminal prompt changes and shows that it is using our newly created environment. Now we can install Django.
Install Django and Create the Project:
With the virtual environment activated, install Django using pip:
(.venv) $ pip install django
This command will install Django and its requirements. The next step is to create a new project.
Now, create your Django project using django-admin startproject:
(.venv) $ django-admin startproject django_project .
Important: The dot (.) at the end specifies the current directory as the location for the project files. Omitting it would create a separate django_project folder, which is not desired.
The final step in our project setup is creating the required apps. In this simple app we only have one feed app.
Create and Register your App:
Since this is a simple app, we'll create a single app named feed. Use the manage.py script:
(.venv) $ python manage.py startapp feed
We need to add our newly created app to the registered apps list. This is done in settings.py file. Next, open the settings.py file located in the django_project directory and add your feed app to the INSTALLED_APPS list:
INSTALLED_APPS = [
    "django.contrib.admin",
    "django.contrib.auth",
    "django.contrib.contenttypes",
    "django.contrib.sessions",
    "django.contrib.messages",
    "django.contrib.staticfiles",
    # Local apps
    "feed.apps.FeedConfig",
]
Add urls for our project to point to our feed app. We will create that feed/urls.py later:
from django.contrib import admin
from django.urls import path, include

urlpatterns = [
    path("admin/", admin.site.urls),
    path("accounts/", include("django.contrib.auth.urls")),
    path("", include("feed.urls", namespace="feed")),
]
Notice that we have added default user urls from the Django framework, too. We use it to enable users to login.
Our project setup is complete and ready for development. To verify everything is set up correctly, you can optionally run the development server:
(.venv) $ python manage.py runserver
This might display warnings about pending migrations, which we can address later.
Ready for Development!
With these steps, your Django project environment is ready for development. Now, you can start building your web application!
Writing the Model
Open models.py file in feed app folder. Write the model for our Post model as:
from django.db import models
from django.conf import settings
from django.urls import reverse

User = settings.AUTH_USER_MODEL

# Create your models here.


class Post(models.Model):
    user = models.ForeignKey(User, on_delete=models.CASCADE)
    text = models.TextField(max_length=500)
    created_at = models.DateTimeField(auto_now_add=True)
    updated_at = models.DateTimeField(auto_now=True)

    def __str__(self) -> str:
        return f"{self.user}: {self.text}"

    def get_absolute_url(self):
        return reverse("feed:post_detail", kwargs={"pk": self.pk})
This code defines a Django model for a social media-style post. Here's a breakdown of the code:
Imports
The code starts by importing necessary modules from Django:
models: provides the base classes for Django models
settings: allows access to Django project settings
reverse: helps with URL reversing
User Model
The User variable is set to the AUTH_USER_MODEL from the project settings. This is a common pattern in Django to refer to the user model, which can be customized.
Post Model
The Post model is defined as a subclass of models.Model. It has the following fields:
user: a foreign key referencing the User model, indicating the author of the post. The on_delete=models.CASCADE parameter ensures that if the user is deleted, all their posts will also be deleted.
text: a text field to store the content of the post, with a maximum length of 500 characters.
created_at and updated_at: datetime fields to track when the post was created and last updated, respectively. The auto_now_add=True and auto_now=True parameters automatically set these fields when the post is created or updated.
Special Methods
The Post model defines two special methods:
__str__: returns a string representation of the post, including the author's username and the post text.
get_absolute_url: returns the URL for the post's detail page using the reverse function.
Forms
Create a new forms.py file in feed app folder and write the required form. In our simple app we only need to write PostForm for Post model:
from django import forms
from .models import Post


class PostForm(forms.ModelForm):
    class Meta:
        model = Post
        fields = ("text",)
        widgets = {
            "text": forms.Textarea(attrs={"class": "form-control"}),
        }
This code defines a Django form for creating and editing posts. Here's a breakdown of the code:
Imports
The code starts by importing necessary modules from Django:
forms: provides the base classes for Django forms
.models: imports the Post model from the current app's models module
PostForm Class
The PostForm class is defined as a subclass of forms.ModelForm. This type of form is specifically designed to work with Django models.
Meta Class
The Meta class is a nested class inside PostForm. It provides metadata about the form:
model: specifies the Django model that this form is associated with, which is the Post model.
fields: specifies the fields from the Post model that should be included in the form. In this case, only the text field is included. We will add user field from the logged in user and created_at and updated_at fields are automatically filled by Django.
widgets: specifies the HTML widgets to use for each field. In this case, the text field is rendered as a Textarea widget with a CSS class of form-control.
Textarea Widget
The Textarea widget is used to render the text field as a multi-line text input. The attrs parameter is used to add a CSS class of form-control to the widget, which is likely used for styling purposes. We are using Bootstrap 5 for styling and will add the required links to base.html file later.
Views
We need to define views for handling CRUD operations and also list and detail views for our Post model. We use class based views here and use related classes in django.views.generic package as superclasses. Open views.py file in feed app folder and write the required views as bellow:
from django.urls import reverse
from django.views.generic import (
    CreateView,
    ListView,
    UpdateView,
    DetailView,
    DeleteView,
)

from django.contrib.auth.mixins import LoginRequiredMixin, UserPassesTestMixin

from .models import Post
from .forms import PostForm

# Create your views here.


class PostListView(ListView):
    model = Post
    context_object_name = "posts"
    paginate_by = 10

    def get_queryset(self):
        return Post.objects.order_by("-created_at")


class PostDetailView(DetailView):
    model = Post

    def get_context_data(self, **kwargs):
        context = super().get_context_data(**kwargs)
        context["previous"] = self.get_previous_object()
        print(self.get_previous_object())
        context["next"] = self.get_next_object()
        return context

    def get_previous_object(self):
        return (
            self.model.objects.filter(created_at__lt=self.object.created_at)
            .order_by("-created_at")
            .first()
        )

    def get_next_object(self):
        return (
            self.model.objects.filter(created_at__gt=self.object.created_at)
            .order_by("created_at")
            .first()
        )


class PostCreateView(LoginRequiredMixin, CreateView):
    model = Post
    form_class = PostForm

    def form_valid(self, form):
        form.instance.user = self.request.user
        return super().form_valid(form)


class PostUpdateView(LoginRequiredMixin, UserPassesTestMixin, UpdateView):
    model = Post
    form_class = PostForm

    def test_func(self) -> bool | None:
        return self.request.user == self.get_object().user


class PostDeleteView(LoginRequiredMixin, UserPassesTestMixin, DeleteView):
    model = Post

    def get_success_url(self) -> str:
        return reverse("feed:post_list")

    def test_func(self) -> bool | None:
        return self.request.user == self.get_object().user
This is a Django views file that defines five views for handling posts:
PostListView
PostDetailView
PostCreateView
PostUpdateView
PostDeleteView
Here's a breakdown of each view:
PostListView
This view displays a list of posts.
It inherits from ListView and defines the following attributes:
model: specifies the Django model to use, which is Post.
context_object_name: specifies the name of the variable to use in the template for the list of posts, which is posts.
paginate_by: specifies the number of posts to display per page, which is 10.
The get_queryset method is overridden to order the posts by their creation date in descending order.
PostDetailView
This view displays a single post.
It inherits from DetailView and defines the following attributes:
model: specifies the Django model to use, which is Post.
The get_context_data method is overridden to add two additional context variables:
previous: the previous post in the list, based on creation date
next: the next post in the list, based on creation date
The get_previous_object and get_next_object methods are used to retrieve the previous and next posts, respectively.
PostCreateView
This view creates a new post.
It inherits from CreateView and defines the following attributes:
model: specifies the Django model to use, which is Post.
form_class: specifies the form class to use, which is PostForm.
The form_valid method is overridden to set the user field of the post to the current logged-in user.
PostUpdateView
This view updates an existing post.
It inherits from UpdateView and defines the following attributes:
model: specifies the Django model to use, which is Post.
form_class: specifies the form class to use, which is PostForm.
The test_func method is overridden to check if the current logged-in user is the same as the user who created the post. If not, the view will raise a PermissionDenied exception.
PostDeleteView
This view deletes an existing post.
It inherits from DeleteView and defines the following attributes:
model: specifies the Django model to use, which is Post.
The get_success_url method is overridden to redirect the user to the post list view after deletion.
The test_func method is overridden to check if the current logged-in user is the same as the user who created the post. If not, the view will raise a PermissionDenied exception.
Mixins
LoginRequiredMixin: ensures that the user is logged in before accessing the view.
UserPassesTestMixin: checks if the user passes a test (in this case, if the user is the same as the user who created the post).
Overall, this code provides a set of views for creating, reading, updating, and deleting posts, with authentication and permission checks in place to ensure that only authorized users can perform these actions.
URLs
Now we need to create urls that redirect to our views. Create a new urls.py file in feed app folder and enter code bellow:
from django.urls import path

from . import views

app_name = "feed"

urlpatterns = [
    path("", views.PostListView.as_view(), name="post_list"),
    path("post/create/", views.PostCreateView.as_view(), name="post_create"),
    path("post/<int:pk>/", views.PostDetailView.as_view(), name="post_detail"),
    path("post/<int:pk>/edit/", views.PostUpdateView.as_view(), name="post_edit"),
    path("post/<int:pk>/delete/", views.PostDeleteView.as_view(), name="post_delete"),
]
This is a Django URL configuration file, for our feed app namespaced as "feed". Here's a breakdown of the code:
Imports
from django.urls import path: imports the path function from Django's urls module, which is used to define URL patterns.
from . import views: imports the views module from the same package (i.e., the current app), which contains the views that will be used to handle requests.
App Name
app_name = "feed": sets the name of the app to "feed". This is used to namespace the URLs and avoid conflicts with other apps.
URL Patterns
The urlpatterns list defines the URL patterns for the app. Each pattern is defined using the path function, which takes three arguments:
The URL pattern as a string
The view function to call when the pattern matches
The name of the URL pattern (optional, but recommended for reverse URL lookup)
Here are the URL patterns defined:
path("", views.PostListView.as_view(), name="post_list"):
URL pattern: an empty string (""), which matches the root URL of the app (/feed/)
View: PostListView.as_view(), which is a class-based view that displays a list of posts
Name: post_list, which can be used to reverse-lookup this URL pattern
path("post/create/", views.PostCreateView.as_view(), name="post_create"):
URL pattern: post/create/, which matches the URL /feed/post/create/
View: PostCreateView.as_view(), which is a class-based view that creates a new post
Name: post_create, which can be used to reverse-lookup this URL pattern
path("post/<int:pk>/", views.PostDetailView.as_view(), name="post_detail"):
URL pattern: post/<int:pk>/, which matches the URL /feed/post/<id>/, where <id> is an integer primary key
View: PostDetailView.as_view(), which is a class-based view that displays a single post
Name: post_detail, which can be used to reverse-lookup this URL pattern
path("post/<int:pk>/edit/", views.PostUpdateView.as_view(), name="post_edit"):
URL pattern: post/<int:pk>/edit/, which matches the URL /feed/post/<id>/edit/, where <id> is an integer primary key
View: PostUpdateView.as_view(), which is a class-based view that updates an existing post
Name: post_edit, which can be used to reverse-lookup this URL pattern
path("post/<int:pk>/delete/", views.PostDeleteView.as_view(), name="post_delete"):
URL pattern: post/<int:pk>/delete/, which matches the URL /feed/post/<id>/delete/, where <id> is an integer primary key
View: PostDeleteView.as_view(), which is a class-based view that deletes an existing post
Name: post_delete, which can be used to reverse-lookup this URL pattern
In summary, this URL configuration defines five URL patterns for the "feed" app, each corresponding to a different view:
post_list: displays a list of posts
post_create: creates a new post
post_detail: displays a single post
post_edit: updates an existing post
post_delete: deletes an existing post
Create Base Template
Create a new templates folder in the root directory of your project. We will use it as project level templates folder. Create base.html under this folder:
<!-- base.html -->

<!DOCTYPE html>
<html lang="en">
  <head>
    <meta charset="UTF-8" />
    <meta name="viewport" content="width=device-width, initial-scale=1.0" />
    <title>
      {% block title %}

      {% endblock %}
    </title>
    <link rel="stylesheet" href="https://cdn.jsdelivr.net/npm/bootstrap@5.3.0-alpha1/dist/css/bootstrap.min.css" />
  </head>
  <body>
    <nav class="navbar navbar-expand-lg navbar-light bg-light">
      <div class="container-fluid">
        <a class="navbar-brand" href="{% url 'feed:post_list' %}">My App</a>
        <button class="navbar-toggler" type="button" data-bs-toggle="collapse" data-bs-target="#navbarSupportedContent" aria-controls="navbarSupportedContent" aria-expanded="false" aria-label="Toggle navigation"><span class="navbar-toggler-icon"></span></button>
        <div class="collapse navbar-collapse" id="navbarSupportedContent">
          <ul class="navbar-nav me-auto mb-2 mb-lg-0">
            <li class="nav-item">
              <a class="nav-link active" aria-current="page" href="{% url 'feed:post_list' %}">Home</a>
            </li>
            <li class="nav-item">
              <a class="nav-link" href="#">About</a>
            </li>
            <!-- Add more nav items here -->
          </ul>
        </div>
      </div>
    </nav>
    <div class="container">
      {% block content %}

      {% endblock %}
    </div>
    <script src="https://cdn.jsdelivr.net/npm/bootstrap@5.3.0-alpha1/dist/js/bootstrap.bundle.min.js"></script>
  </body>
</html>
We are using bootstrap 5 for styling our templates, add the required links are added. In this base template we have to blocks: title and content. We use these blocks to inject elements in child templates as we will see later.
We should add this template folder to search list of templates. This is done in settings.py file:
TEMPLATES = [
    {
        "BACKEND": "django.template.backends.django.DjangoTemplates",
        "DIRS": [BASE_DIR / "templates"], # Add templates folder here
        "APP_DIRS": True,
        "OPTIONS": {
            "context_processors": [
                "django.template.context_processors.debug",
                "django.template.context_processors.request",
                "django.contrib.auth.context_processors.auth",
                "django.contrib.messages.context_processors.messages",
            ],
        },
    },
]
In feed app folder create a templates folder and within it create another folder called feed. This is the standard namesapce for Django templates. We need to write templates for post_list.html, post_detail.html, post_form.html, and post_confirm_delete.html in that folder.
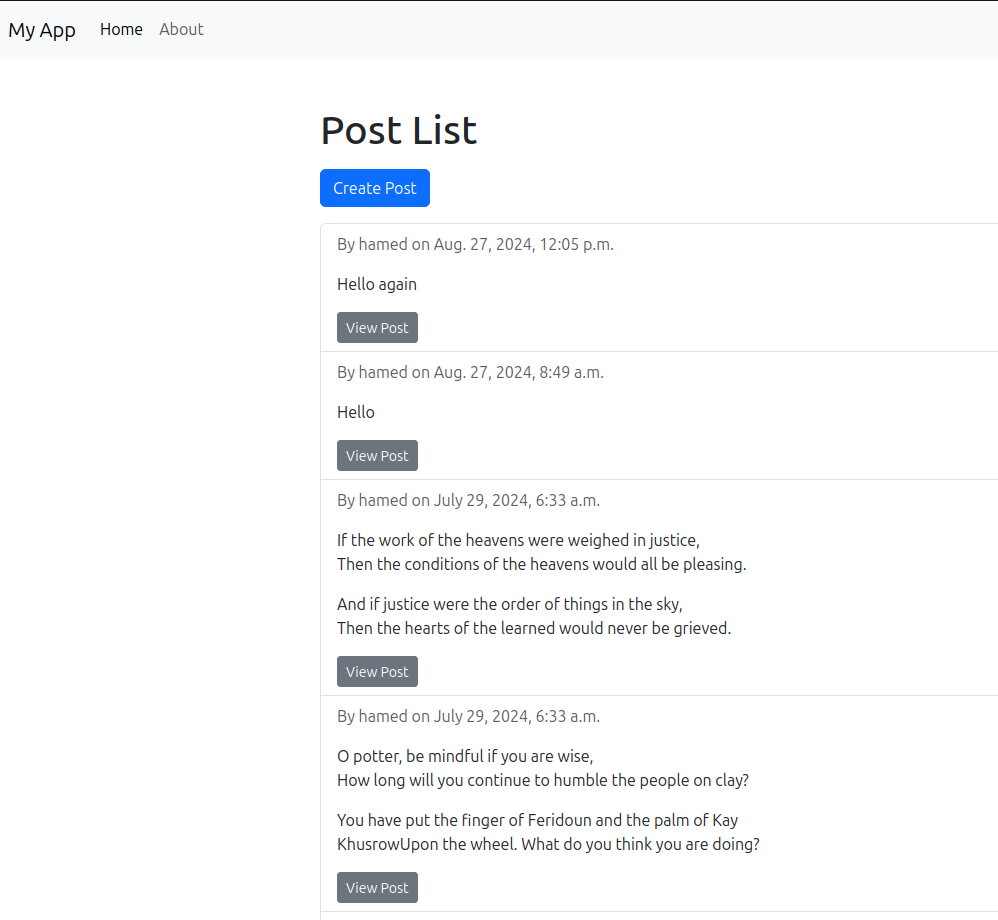
post_list.html
{% extends 'base.html' %} {% block content %} <div class="container mt-5"> <h1 class="mb-3">Post List</h1> <a href="{% url 'feed:post_create' %}" class="btn btn-primary mb-3">Create Post</a> <ul class="list-group"> {% for post in posts %} <li class="list-group-item"> <p class="text-muted">By {{ post.user }} on {{ post.created_at }}</p> <p>{{ post.text|linebreaks }}</p> <a href="{% url 'feed:post_detail' post.id %}" class="btn btn-secondary btn-sm">View Post</a> </li> {% empty %} <li class="list-group-item">No posts available.</li> {% endfor %} </ul> <nav aria-label="Page navigation"> <ul class="pagination justify-content-center"> {% if page_obj.has_previous %} <li class="page-item"> <a class="page-link" href="?page=1">« First</a> </li> <li class="page-item"> <a class="page-link" href="?page={{ page_obj.previous_page_number }}">Previous</a> </li> {% endif %} <li class="page-item"> <a class="page-link active">Page {{ page_obj.number }} of {{ page_obj.paginator.num_pages }}.</a> </li> {% if page_obj.has_next %} <li class="page-item"> <a class="page-link" href="?page={{ page_obj.next_page_number }}">Next</a> </li> <li class="page-item"> <a class="page-link" href="?page={{ page_obj.paginator.num_pages }}">Last »</a> </li> {% endif %} </ul> </nav> </div> {% endblock %}We have added pagination buttons to this template, too.
post_detail.html
{% extends 'base.html' %}

{% block content %}
  <div class="container mt-5">
    <div class="card">
      <div class="card-body">
        <h1 class="card-title">
          Posted by {{ post.user }} on {{ post.created_at }}
          {% if request.user == post.user %}
            <a href="{% url 'feed:post_edit' post.id %}" class="btn btn-secondary mx-1">Edit</a>
            <a href="{% url 'feed:post_delete' post.id %}" class="btn btn-danger mx-1">Delete</a>
          {% endif %}
        </h1>
        <p class="card-text">{{ post.text|linebreaks }}</p>
      </div>
    </div>
    <div class="row">
      <div class="btn-group">
        <a href="{% url 'feed:post_list' %}" class="btn btn-primary mx-1">Back to Post List</a>
        {% if previous %}
          <a href="{{ previous.get_absolute_url }}" class="btn btn-primary mx-1">Previous</a>
        {% endif %}
        {% if next %}
          <a href="{{ next.get_absolute_url }}" class="btn btn-primary mx-1">Next</a>
        {% endif %}
      </div>
    </div>
  </div>
{% endblock %}
post_form.html
{% extends 'base.html' %}

{% block content %}
  <div class="container mt-5">
    <h1 class="mb-3">Create a new post</h1>
    <form method="post" class="needs-validation">
      {% csrf_token %}

      <div class="mb-3">
        {{ form.text.label_tag }}
        {{ form.text }}
        {% if form.text.errors %}
          <div class="invalid-feedback">
            {% for error in form.text.errors %}
              {{ error }}
            {% endfor %}
          </div>
        {% endif %}
      </div>
      <button type="submit" class="btn btn-primary">Create</button>
    </form>
  </div>
{% endblock %}
post_confirm_delete.html
<!-- post_confirm_delete.html -->
{% extends 'base.html' %}
{% load static %}

{% block title %}
  Delete Post
{% endblock %}

{% block content %}
  <div class="container mb-3" style="padding-top: 150px;">
    <h1>Delete Post</h1>
    <p>Are you sure you want to delete the post "{{ object.title }}"?</p>
    <form method="post">
      {% csrf_token %}
      <button type="submit" class="btn btn-danger">Yes, delete</button>
      <a href="{% url 'feed:post_detail' post.id %}" class="btn btn-secondary">No, cancel</a>
    </form>
  </div>
{% endblock %}
Migrating and Testing
Now is the moment of the truth. We need to migrate our models to the database and then we can test our application.
(.venv) $ python manage.py makemigrations feed
(.venv) $ python manage.py migrate
If everything is Okay run the development server:
(.venv) $ python manage.py runserver
And navigate your broweser to see the result. There is no posts in there yet. To test, first stop the server (CNTR + C in the runnning terminal) and create a superuser:
(.venv) $ python manage.py createsuperuser
Follow the instructions for creating a user. Use this user to login and create a new post.
We have added urls for user login in the main urls.py file of the project. The only thing we need to complete is adding login.html template. In the project level templates folder create a login.html file and fill it like this:
login.html
{% extends 'base.html' %}

{% block content %}
  <h1>Login</h1>
  <form method="post">
    {% csrf_token %}
    {{ form.as_p }}
    <button type="submit">Login</button>
  </form>
{% endblock %}
Now add the setting for login and logout redirect at the end of settings.py file:
LOGIN_REDIRECT_URL = "feed:post_list"
LOGOUT_REDIRECT_URL = "feed:post_list"
Now run the production server again:
(.venv) $ python manage.py runserver
And navigate your browser to 127.0.0.1:8000/accounts/login
After log in you can create new posts.
This is how simple it is to develop a complete Django web application. Although the model for our app is pretty simple the process is the same. Before starting development of a Django project it is crucial to analyze and design your business model carefully.